The simple on-the-go app for window cleaners
(for iPhone, iPad, and iPod Touch)
A list of features:
- Automatically updates your weekly to-do-list
- Indicates jobs overdue
- Indicates payments overdue
- Indicates advance payments
- Shows activities for upcoming weeks
- Allows charing week job list to others via email or text
- Automatically updates your payments to receive list
- Shows weekly/monthly received payments
- Keeps customer and job details
- Shows customer payment history
This is not an app for a web based system
with a monthly fee. Just one single purchase for unlimited use. Available via
the Apple App Store.
Welcome
Thank you for browsing here. You are welcome to finding more information about the Doing Windows app here on this page. Doing Windows is a simple to use on-the-go app for window cleaners to make life easier on the day-to-day admin side of the business.
The guidance below will help you to get started using the software on your iPhone, iPad, and/or iPod Touch.
You will notice, as you open the app when no data is available yet, you have four buttons at the bottom:
Getting Started
You can immediately add customers you plan to do jobs for in the present week or upcoming weeks by adding in your customer information and job information as you are building your round from scratch.
Adding Customers
Go to Customers (third tab at the bottom screen) and tap the + (top right) to add a new customer.
When adding a new customer you need to specify the address. Tap Select for the street. If there are no streets listed yet, then tap the + (top right) to add one.
When you add a new street you need to select the place where the street is located. Tap Select Place to choose from the list. If no places are listed yet, then tap the + (top right) to add one. A place can be a village or city neighbourhood, whatever how you want to define your work areas. When you add a new place fill in the name and tap Done (top right).
Tap the newly added place, which makes a check mark appear, and then tap Done (top right). You can then fill in the street name for the selected place, and then tap Done (top right). Tap the newly added street, which makes a check mark appear, and then tap Done (top right).
When you have the street selected you can add the other details, beginning with building number and/or building name. For residential customers you can use the building number for the house number and the building name field for the house number addition (such as A, B, C, etcetera) if needed. For commercial customers you might want to use the building name only to indicate the customer company name. Continue with the remaining fields for the customer contact details. You can add additional information about the customer under comments.
When all details are added tap Done (top right) to have the new customer added to your customer base.
At this point you will be asked if you want to add a job now or later.
Adding a New Customer Job
By default jobs will not be added to a round, but you can define one to group jobs together that have the same frequency.
Tap Select for the service. If there are no services added to Doing Windows yet you will see an empty list. Tap the + (top right) to add a new service.
You can give your service a name and standard price (which you can later adjust per job) and add a note for yourself to it. Examples of products are: 'Window cleaning bungalow', 'Window cleaning flat first floor', 'Conservatory cleaning', 'Gutter cleaning first level' and so on. Setting a standard price for the services you provide help keeping your prices consistent.
You can determine the expected time you think the job will take. Specifying this is not a requirement.
The job price is already filled in from what you have defined from the service. You can adjust it if necessary.
Set the begin date for the first time you are going to do this job, and set the job frequency (like a rota). You will see the next date already filled in as you specified the job frequency (it will be the same as the begin date if this is a future date).
You can make a note for this job. Tap Done to save the job details.
Tap Back a few times to find your new customer in the list.
To Do (Doing Windows main screen)
This is what it's all about - the window cleaning or other jobs you need to do. You can find the jobs listed as they are scheduled for the week on the To Do list (first icon at the bottom).
The picture on the right shows how a new job that has been added as described above would appear if the begin date would fall in the present week. You can tap a job to see more information about it.
Jobs are listed in order by building number and name and grouped by street name in alphabetical order. Above the list you can see the week you are viewing, the number of jobs, and the total job list value. The > button next to the week allows you to view upcoming weeks.
You can share the list using email, text message, or otherwise using the share button (icon next to the Edit button). You will be asked wether you want to include price information in the shared list or not.
You can choose how you want to share the job list from the listed options that will appear. The list of options to choose from will depend on the applications you have installed on your iPad, iPhone, or iPod Touch and if they support the share feature or not.
As you are doing your jobs you can edit the list as you have jobs finished or need to cancel jobs from the to do list. Slide the row you want to edit to the left and the options appear. Alternatively, tap Edit to make changes. While in edit mode you can change the order of the jobs within the street, if the jobs are grouped by street. If the jobs are grouped by day of the week, you can change the order within each day or move jobs to another day. (Except for jobs that are overdue from the week before. These always are scheduled for the first day of the week.) Tap Done when you have applied the changes you wanted to make at that time.
At this point you will be notified when there overdue payments or advance payments recorded on the jobs that are ticked off.
For each job you tick off as finished a payment record will be generated, unless there is an advance payment recorded for the job.
The price of the finished job will be taken from the customer's balance automatically.
You can repeat this during the day as you are doing the jobs until all jobs are gone from the list.
Managing Payments
Go to Payments (second icon at the bottom). The payments are grouped by status To Receive and Received.
Records for payment for finished jobs (and that have no advance payments recorded on them) will automatically appear here, showing the due date (when the job was ticked off as finished) and next job date (depending of the job cycle you have set).
In the list of payments to receive the value of payments that customers owe you is presented above the list. When you go back to collect payment or when you are checking your incoming payments on your bank account you can update the list in the same way as you tick off finished jobs as described above. Tap Edit to make changes. Tap Done when you have applied the changes you wanted to make at that time.
You can repeat this any time as you are collecting payment or process incoming payments on your bank account until all payments are gone from the list of payments to receive.
Payments that you have ticked off as paid will appear in the list of received payments. Tap the Received tab to change the view.
In the payments received list all payments are ordered by date and grouped and totalled per month, per week, or per day. You can toggle the grouping by tapping the options button on the top right.
You can view an individual payment by selecting it. When you view an individual payment you can delete it by tapping the trash can button, or make changes using the Edit button. You can adjust the paid amount, pay date, and note. When you adjust the paid amount this change will also affect the customer's balance. The customer's balance is not affected for the amount you fill in as tip. Tap Done to apply the changes or Cancel to ignore.
When a customer pays in advance for future jobs, you can add payments to the list of payments received. Tap the + (top right) to add payments.
Select the customer, and if there is more than one job defined for that customer, select a job. (If there is just one job for the customer recorded in Doing Windows, then it will be pre-selected automatically.)
When the job is selected the next job date, amount, pay date, and a note is filled in automatically. Simply tap the Paid button to add the advance payment. Each advance payment will also increase the amount of the customer's balance. The added payment will immediately be displayed and the next following job date will appear in the details above. Tap the Paid button again will add that future job as paid in advance as well. Repeat this until the number of future jobs paid for is covered. Tap Done (top right) to finish adding advance payments for this job.
The added advance payments will be listed on the payments received list. As you later tick off finished jobs that have been prepaid you will be notified of this. Prepaid jobs will not have a payment record created in the To Receive list as it has already been covered with a record in the Received list.
Keeping Customer Details
Go to Customers (at the bottom, second icon from the right) to view your customers.
The list of customers is grouped by place, and ordered by street name and building number. Tap a customer to view its details. You will see payment history displayed as well.
From here you can delete a customer or edit the details.
Protecting Your Data
As you are using Doing Windows in your day-to-day business the data you are accumulating becomes more valuable and you want to make sure you don't lose all the information you are keeping.
Please, be aware Doing Windows is not a web-based app and all your data is stored on your device. This means that you do not depend on a wifi or mobile data connection which can hinder you on-the-go, but it also means that your information is not stored on an internet connected server somewhere.
If you are using iCloud to store your data, then when your phone crashes you can restore all your apps including their data to your replacement phone. (It happened to me once with an iPhone that froze and was replaced at the Apple Store in Edinburgh. I put in my account details and all my apps and their data was restored onto the new iPhone.)
It is a good habit to make a backup though from time to time. Please use iTunes to save your data to a safe place on your PC or external storage.
In order to do this, start iTunes on your PC.
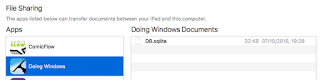 From iTunes locate the Doing Windows app on your device under File Sharing and click the app. You will see the data file listed on the right.
You can then save it to a safe place on your PC or connected storage medium.
If needed for some reason, you can restore the saved file back to your iPhone, iPad, or iPod Touch.
Welcome
Thank you for browsing here. You are welcome to finding more information about the Doing Windows app here on this page. Doing Windows is a simple to use on-the-go app for window cleaners to make life easier on the day-to-day admin side of the business.
The guidance below will help you to get started using the software on your iPhone, iPad, and/or iPod Touch.
You will notice, as you open the app when no data is available yet, you have four buttons at the bottom:
- To Do: shows your list of jobs for current week and upcoming weeks,
- Payments: keeps record of the payments to receive, shows and allows adjustment of the payments you have received,
- Customers: keeps record of all your customers, the jobs you do for them, and their payment history, and
- More: contains more functions, like Breaks (for taking weeks off), Expenses (for keeping track of business related expenses), Mileage (for keeping track of business related vehicle use), Prospects (for making notes of potential customers), Rounds (for grouping customer jobs), Services (for defining default jobs and price).
Getting Started
You can immediately add customers you plan to do jobs for in the present week or upcoming weeks by adding in your customer information and job information as you are building your round from scratch.
Adding Customers
Go to Customers (third tab at the bottom screen) and tap the + (top right) to add a new customer.
When you add a new street you need to select the place where the street is located. Tap Select Place to choose from the list. If no places are listed yet, then tap the + (top right) to add one. A place can be a village or city neighbourhood, whatever how you want to define your work areas. When you add a new place fill in the name and tap Done (top right).
Tap the newly added place, which makes a check mark appear, and then tap Done (top right). You can then fill in the street name for the selected place, and then tap Done (top right). Tap the newly added street, which makes a check mark appear, and then tap Done (top right).
When you have the street selected you can add the other details, beginning with building number and/or building name. For residential customers you can use the building number for the house number and the building name field for the house number addition (such as A, B, C, etcetera) if needed. For commercial customers you might want to use the building name only to indicate the customer company name. Continue with the remaining fields for the customer contact details. You can add additional information about the customer under comments.
When all details are added tap Done (top right) to have the new customer added to your customer base.
Adding a New Customer Job
By default jobs will not be added to a round, but you can define one to group jobs together that have the same frequency.
Tap Select for the service. If there are no services added to Doing Windows yet you will see an empty list. Tap the + (top right) to add a new service.
You can give your service a name and standard price (which you can later adjust per job) and add a note for yourself to it. Examples of products are: 'Window cleaning bungalow', 'Window cleaning flat first floor', 'Conservatory cleaning', 'Gutter cleaning first level' and so on. Setting a standard price for the services you provide help keeping your prices consistent.
You can determine the expected time you think the job will take. Specifying this is not a requirement.
The job price is already filled in from what you have defined from the service. You can adjust it if necessary.
Set the begin date for the first time you are going to do this job, and set the job frequency (like a rota). You will see the next date already filled in as you specified the job frequency (it will be the same as the begin date if this is a future date).
You can make a note for this job. Tap Done to save the job details.
Tap Back a few times to find your new customer in the list.
To Do (Doing Windows main screen)
This is what it's all about - the window cleaning or other jobs you need to do. You can find the jobs listed as they are scheduled for the week on the To Do list (first icon at the bottom).
Jobs are listed in order by building number and name and grouped by street name in alphabetical order. Above the list you can see the week you are viewing, the number of jobs, and the total job list value. The > button next to the week allows you to view upcoming weeks.
You can share the list using email, text message, or otherwise using the share button (icon next to the Edit button). You will be asked wether you want to include price information in the shared list or not.
You can choose how you want to share the job list from the listed options that will appear. The list of options to choose from will depend on the applications you have installed on your iPad, iPhone, or iPod Touch and if they support the share feature or not.
At this point you will be notified when there overdue payments or advance payments recorded on the jobs that are ticked off.
For each job you tick off as finished a payment record will be generated, unless there is an advance payment recorded for the job.
The price of the finished job will be taken from the customer's balance automatically.
You can repeat this during the day as you are doing the jobs until all jobs are gone from the list.
Managing Payments
Go to Payments (second icon at the bottom). The payments are grouped by status To Receive and Received.
Records for payment for finished jobs (and that have no advance payments recorded on them) will automatically appear here, showing the due date (when the job was ticked off as finished) and next job date (depending of the job cycle you have set).
You can repeat this any time as you are collecting payment or process incoming payments on your bank account until all payments are gone from the list of payments to receive.
Payments that you have ticked off as paid will appear in the list of received payments. Tap the Received tab to change the view.
In the payments received list all payments are ordered by date and grouped and totalled per month, per week, or per day. You can toggle the grouping by tapping the options button on the top right.
You can view an individual payment by selecting it. When you view an individual payment you can delete it by tapping the trash can button, or make changes using the Edit button. You can adjust the paid amount, pay date, and note. When you adjust the paid amount this change will also affect the customer's balance. The customer's balance is not affected for the amount you fill in as tip. Tap Done to apply the changes or Cancel to ignore.
When a customer pays in advance for future jobs, you can add payments to the list of payments received. Tap the + (top right) to add payments.
Select the customer, and if there is more than one job defined for that customer, select a job. (If there is just one job for the customer recorded in Doing Windows, then it will be pre-selected automatically.)
When the job is selected the next job date, amount, pay date, and a note is filled in automatically. Simply tap the Paid button to add the advance payment. Each advance payment will also increase the amount of the customer's balance. The added payment will immediately be displayed and the next following job date will appear in the details above. Tap the Paid button again will add that future job as paid in advance as well. Repeat this until the number of future jobs paid for is covered. Tap Done (top right) to finish adding advance payments for this job.
The added advance payments will be listed on the payments received list. As you later tick off finished jobs that have been prepaid you will be notified of this. Prepaid jobs will not have a payment record created in the To Receive list as it has already been covered with a record in the Received list.
Keeping Customer Details
Go to Customers (at the bottom, second icon from the right) to view your customers.
The list of customers is grouped by place, and ordered by street name and building number. Tap a customer to view its details. You will see payment history displayed as well.
From here you can delete a customer or edit the details.
Protecting Your Data
As you are using Doing Windows in your day-to-day business the data you are accumulating becomes more valuable and you want to make sure you don't lose all the information you are keeping.
Please, be aware Doing Windows is not a web-based app and all your data is stored on your device. This means that you do not depend on a wifi or mobile data connection which can hinder you on-the-go, but it also means that your information is not stored on an internet connected server somewhere.
If you are using iCloud to store your data, then when your phone crashes you can restore all your apps including their data to your replacement phone. (It happened to me once with an iPhone that froze and was replaced at the Apple Store in Edinburgh. I put in my account details and all my apps and their data was restored onto the new iPhone.)
It is a good habit to make a backup though from time to time. Please use iTunes to save your data to a safe place on your PC or external storage.
In order to do this, start iTunes on your PC.

You can then save it to a safe place on your PC or connected storage medium.
If needed for some reason, you can restore the saved file back to your iPhone, iPad, or iPod Touch.